
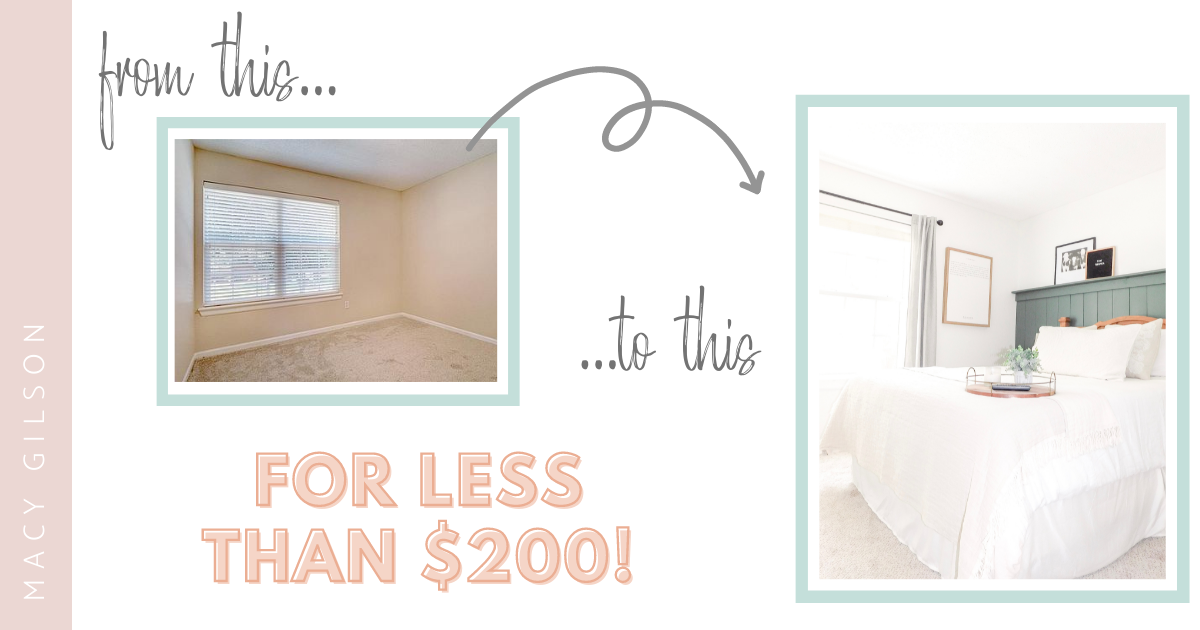
Are you ready to DIY a wall in your house, but aren’t quite sure where and how to begin? I’ve been there, too, and I’ve learned some really great tips and tricks along the way, so today I’ll be taking you through this DIY bedroom shiplap accent wall with easy step-by-step directions and links to the exact supplies I purchased. PS - Did I mention this DIY beginner project cost less than $200?!
Hey, friend! My name is Macy Gilson and I am so excited you’re here. I am a pediatric speech language pathologist, children’s author, and disability advocate. I started this community as a place for parents to share stories and find support in their mission to raise kind humans and create welcoming homes. I love all things DIY, disability awareness, and education and I am honored that you’re here!
Most days our community hangs out on Instagram, so you can click here to join us!


DIY Shiplap Bedroom Accent Wall
I’ll be the first to admit that art class was never my subject - I think I’m too much of a perfectionist to just “feel it out” and “see how it goes” - so I’m telling the truth when I say that DIY intimidated the heck out of me! All of these beautiful “Pinterest-worthy” homes seemed so unattainable, until one day I put my house on the market and realized that I, too, had someone’s version of a “Pinterest-worthy” home. So now I’m going back and documenting all of the projects that I was too afraid to share before, in hopes of inspiring you to create your Pinterest home - one budget friendly DIY at a time!
This post may contain affiliate links. For more information, you can read my disclosure statement here.
Supplies Needed for a Shiplap Accent Wall

Primed MDF Shiplap Siding: ($11.15/board - I needed 10 boards) With the popularity of DIY on the rise, home stories like Home Depot and Lowes are getting smart and offering shiplap right out of the box - no scavenging for old wood from a farmhouse that only exists on HGTV! These MDF boards are great because they’re already primed and ready for paint, and the unique part about MDF is that it doesn’t warp or have knots/jagged edges like real wood. Another reason why I chose this siding is because I liked how wide the planks were (but I’ve also done a “skinny lap” wall that I am equally obsessed with). You can choose any width you’d like, but if you’re looking for something similar to mine, I would go with anywhere between a ½” x 4” plank to a ½” x 6” plank. You also need to decide how tall you would like your shiplap. I chose 5 ft because I had 8 ft ceilings and I didn’t want the wall to look evenly divided in half. I also wanted to ensure my 4 ft tall bed did not come to the top of the shiplap.
Now here is where our basic math comes in (don’t hate me…I promise it’s simple!)
When choosing quantity, simply take the width of your wall and divide it by the width of your planks. For example, my wall was 10 ft wide and my planks were 6 inches wide (or ½ ft).
10 ft wall ÷ 0.5 ft plank = 20 planks of shiplap
This calculation tells me I will need 20 planks, but the planks I purchased are 12 feet long, so I can get two pieces of 5 ft shiplap from each 12 ft board.
20 planks ÷ 2 pieces of shiplap each = 10 planks of shiplap total
See, I told you it wasn’t that bad! You can use this same calculation but plug in your numbers to learn exactly what you’ll need.
MDF Base Moulding: ($16/board - 1 or 2 boards depending on preference) Let me start off by saying I’ve done this both ways - I have kept the existing baseboards and stacked the shiplap right on top, and I’ve also taken the existing baseboard off and added a new baseboard to match the shiplap. I much prefer the look of the latter because it gives a more polished and professional look. If you’re planning to keep your existing baseboard, you will only need one of these boards (to go along the top of your row of shiplap), but if you’re wanting a look like mine, you’ll need two of these boards (one for the top and one to act as your new baseboard). These boards are about half the width of the plank ( ½” x 3 ½”) I used for the vertical shiplap and that’s a complete personal preference. You can absolutely use a board the exact same size as your vertical planks - just make sure you purchase more than I suggested above!
Common Board: ($10.56/board - you only need one) One of the things I really wanted when I planned out the design of this bedroom accent wall was a thin shelf on top of the shiplap. I wanted to be able to put frames, or a candle, or a bud vase as decor above the bed and it ended up being a happy accident in the end. Because my vertical planks were ½” deep, the new shiplap wall ended up sticking out ½” from the wall, so the shelf idea turned out to be a necessity to cover the gap. I chose a 4” common board so my shelf wouldn’t stick out too far. You will need it to be at least the same length as the entirety of your wall and if it’s too long, you can have Home Depot cut it in the store..
Paint: ($8/sample) Let’s talk about the fun stuff! Depending on how large your wall is, you should be able to get by with just the sample tin of paint. I chose Pewter Green by Sherwin Williams but DO NOT BE FOOLED! The online swatch of this color looks nothing like the real thing. I fell in love with Pewter Green when I saw it on a paint chip in store, and the color of the paint matched the paint chip perfectly, but the color on Sherwin Williams’ website is deceiving. I’ll insert photos so you can see.
Nail gun If you plan to DIY more in the future, a nail gun is hands down the first power tool you should invest in, and you can find them pretty affordably on Amazon!
Wood filler: I used “natural” but there is also “white” and for this project, the color doesn’t really matter since you’ll be painting over it.
Paint tools (paintbrush, tape, sandpaper, plastic to cover floor, etc.)
TOTAL: about $180

This is the online swatch of “Pewter Green” by Sherwin Williams, but in real life, the color looks exactly like my shiplap wall and the next photo (from Sherwin Williams’ website).

This is a photo of an interior wall painted “Pewter Green” on Sherwin Williams’ website. You can see how much lighter it is in real life compared to the online swatch.
Step-by-Step Guide to a Shiplap Accent Wall

STEP ONE: I shared a lot of the instructions in the “Materials” section of this blog, mostly because you need to do some calculations before you show up at your local home improvement store. To recap, you will need to measure the length of your wall and decide how tall you’d like your shiplap wall to be before you can do anything else.
STEP TWO: Once you’ve determined these two things, use this calculation to figure out how much MDF you’ll need to purchase:
___ length of the wall ÷ ___ width of the plank = ___ planks of shiplap needed
And then use this formula to make sure you aren’t overbuying planks:
___ planks needed per calculation above ÷ ___ pieces of shiplap you can get out of each plank = ___ planks of shiplap total
STEP THREE: Now you should know what you need and how much you need, so start by removing the existing baseboard from your wall. Once removed, place your first vertical plank to the farthest of one side of your wall and make sure it is snug with the floor. Use a nail gun (or nail glue) to adhere it to the wall. Determine if you’d like a gap in your shiplap, and if so, how big you’d like your gap to be. Use a common household item as a spacer (think quarter, clothespin, etc.) and then nail your next board in place. Continue until you’ve reached the other side of your wall and then cover your holes with a tiny amount of wood filler. Once dried, lightly sand over the spots of wood filler until smooth. (TIP: you may need to trim your last piece of wood to fit perfectly - Home Depot can do this for you if you don’t have a table saw)
STEP FOUR: If you chose to remove your old baseboard, place the new baseboard directly on top of the vertical planks you just installed and make sure it sits level with the floor. Nail the baseboard to the vertical planks and cover the holes with wood filler. Do the same thing again for the plank that will run along the top. Try your best to ensure the top plank covers all of the pieces of vertical shiplap (there may be some variation in height due to uneven floors, but we will cover this later).
STEP FIVE: Now comes the fun part! Paint your shiplap, baseboard and top board, as well as both the top and bottom of your common board! It is important to paint both sides of your common board because even though we haven’t placed it on the wall yet, you will be able to see the underside of the board depending on a) how tall you are and b) if you plan for people to lay in bed bed under the shelf.
STEP SIX: After your paint has dried (I recommend two coats), Place your common board (AKA the shelf) on top of your vertical shiplap. Use a nail gun to adhere the shelf to the vertical wall. (TIP: Try to get your nails as close to the wall as possible because the shelf slightly hangs over the edge of the shiplap, and your nails will go straight through if you aren’t lined up over the shiplap)
STEP SEVEN: Step back, give yourself a pat on the back, and admire your hard work! And then snap a pic and tag me @macy.gilson so I can admire too!
Frequently Asked Questions

I don’t think my floor is level. What if my vertical planks aren’t even?
Don’t worry! This happened to me, too. The reason we are using a baseboard along the bottom and the top is to cover up any inconsistencies in the height of your vertical boards!
What do I do if my pieces don’t fit snug with the wall?
Believe it or not, most walls aren’t a perfect 90 degrees, so there may be some gaps between your board and the wall. You can use caulk to blend any seams.
Can I use this technique for a full shiplap wall
Absolutely! I did this in another bedroom and ran my shiplap from the carpet all the way up to the ceiling. I still chose to run a new baseboard along the bottom and continued crown moulding across the top to match the rest of the room.
That’s it - it’s really that simple. With a couple of hours and less than $200, you can create the most beautiful DIY shiplap accent wall. If you’re anything like me, you’ll love the thrill and creativity of DIY and find yourself slowly tackling more and more projects until you have your own version of a “Pinterest worthy” home. Be sure to follow me on Instagram and Pinterest and tag me so I can share your DIY shiplap accent with our community!

