
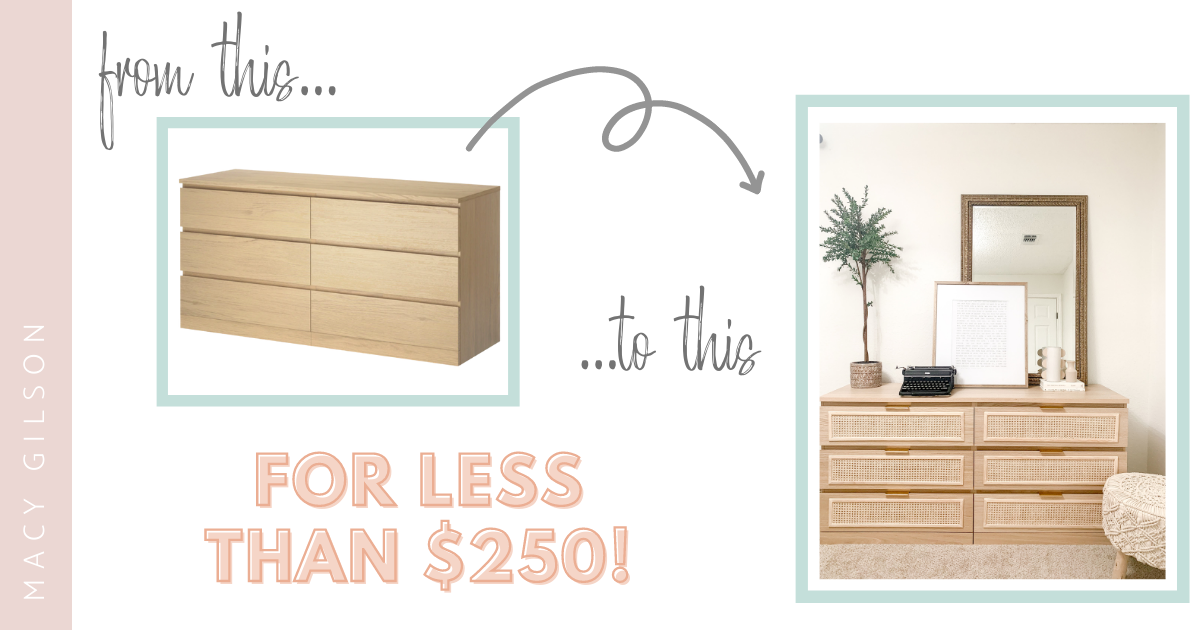
This DIY Cane Dresser IKEA Hack is perfect for beginners that are looking for a beautiful dresser (that doesn’t cost you two months of rent!) Today I’m sharing exactly how I created this DIY cane dresser IKEA hack (for around $250) and how you can, too!
Hey, friend! My name is Macy Gilson and I am so excited you’re here. I am a pediatric speech language pathologist, children’s author, and disability advocate. I started this community as a place for parents to share stories and find support in their mission to raise kind humans and create welcoming homes. I love all things DIY, disability awareness, and education and I am honored that you’re here!
Most days our community hangs out on Instagram, so you can click here to join us!


DIY Cane IKEA Dresser Hack
I frequently find myself swooning over the furniture I see on Pinterest, but not so in love with the prices. Sound familiar? If you’ve scoured social media for the best interior design ideas and been disappointed by another $3000 dresser, you’re in the right place!
This post may contain affiliate links. For more information, you can read my disclosure statement here.
Supplies Needed for a DIY Cane Dresser

Ikea Malm Dresser: I originally wanted the IKEA Hemnes dresser for this do-it-yourself project, but it was out of stock, so I chose the IKEA Malm dresser instead and ended up loving it even more! The Malm dresser comes in two, three, four or six drawers which is what I chose for this project. I also recommend choosing the white oak stained veneer if you’re looking to achieve a look similar to mine, but if you are painting the dresser or want a bolder look, there are three additional color options: gray, black/brown, or white. These dressers both fly off the shelves quickly, so if you have your eye on one, grab it while you can.
Drawer Hardware: I really wanted a clean, sleek drawer pull to keep this DIY cane dresser from looking too rustic or boho. I ended up choosing these pulls from Amazon in the 4 ¾” size. They came in a pack of 10, so depending on how many drawers your dresser has, you may want to change your quantity. Here are some other options I considered: BLACK, GOLD, VINTAGE
Cane Webbing: I did a ton of research before purchasing this cane webbing and it worked beautifully. The amount of cane you will need is dependent on how many drawers you have and how large you want your cane insets.
½” Pine Moulding: I picked this up from Home Depot and cut it in the store. It comes in a 6 ft or 12 ft strip and the price is per foot, so make sure you factor that in before purchasing. I ended up needing about 24 feet for the dimensions I chose, so I got two 12 ft strips.
Nail gun or Staple gun: A staple gun will work for the cane, but you will need a nail gun or at least wood glue to adhere the trim to the dresser. If you plan to DIY more in the future, a nail gun is hands down the first power tool you should invest in, and you can find them pretty affordably on Amazon!
Wood filler: Make sure to purchase wood filler that matches the color of your dresser, if possible. I used “natural” but there is also “white” if you chose a white dresser.
Step-by-Step Guide to the IKEA Dresser Hack

STEP ONE: If you’re familiar with IKEA, you know they provide fairly easy-to-follow assembly instructions. Once you have assembled your dresser, take the individual drawers out and lay them drawer face facing up.
STEP TWO: Determine how large you want your cane insets to be. The drawer faces on the six drawer IKEA Malm dresser are 6 ½” tall by 31.5” wide and I chose to make my inserts 4 ½” tall by 27.5” wide. This left me 1” on the top and bottom of each drawer face and 2” on either side. I played around with smaller sizes and different drawer pulls, but since I used “hidden” pulls that didn’t take up any space on the drawer face, I thought this configuration looked the best.
STEP THREE: Depending on the cane you purchase, it may be recommended to soak the cane in a sink or bathtub to make it more pliable. My cane was flexible enough for me to measure and cut without soaking, so I used a ruler and scissors to cut the cane to my predetermined size (4 ½” tall by 27.5” wide). I repeated this another five times for a total of six cane pieces, one for each drawer face.
STEP FOUR: I used a pencil to mark exactly where my cane would go and then used a staple gun to attach the cane pieces to each drawer face. Only staple the cane along the edges and corners - not in the middle of the webbing. If you staple in the middle of the webbing it will appear lumpy and loose, so be sure to pull tight and only staple the edges. Don’t worry if the edges of your cane aren't perfectly even - you will cover the edges with wood trim.
STEP FIVE: Measure your wood trim to the same measurements as the cane - two pieces of trim that are 27.5” long and two pieces of trim that are 4 ½” long. It’s also important to cut the edges at a 45 degree angle, so that the pieces of trim meet nicely in the corners.
STEP SIX: Use wood glue (I like this one) to adhere the wood on top of the cane. Wood glue is super strong, but if you don’t have clamps to hold the trim in place while the glue sets, I recommend using a nail gun to reinforce the trim into the dresser face. If you choose to use a nail gun, you will need to use wood filler to fill your holes. Once the wood filler dries, use a fine grit sandpaper (I used a 120 grit) and lightly sand to smooth the wood filler.
STEP SEVEN: The drawer pulls will come with screws, so measure to the center of your drawer fronts (12” for IKEA Malm dresser) and secure the hardware using the provided screws.
STEP EIGHT: Reassemble the drawers into the dresser you’ve already constructed and admire your work!
Frequently Asked Questions

Can this method be used for night stands or buffets?
Yes! This outline can be used for any dresser (hello Facebook Martketplace find 👋🏼), as well as a variety of other IKEA dressers. In fact, I originally wanted the IKEA Hemnes dresser for this do-it-yourself project, but it was out of stock, which is why I ended up using the IKEA Malm dresser. You can also use the IKEA Kullen dresser, which is very similar to the Malm dresser. Any of the smaller IKEA dressers (two and three drawer) would make beautiful nightstands or end tables, too!
What do I do if my cane keeps unraveling when I cut?
Cane can be difficult to cut, so try to follow the pattern in your cane. If you are experiencing unraveling or loosening of the cane, try soaking your cane in warm water for thirty minutes and cutting while moist and pliable. If you’re really experiencing difficulty, you can put painters tape along your edge because it will eventually be covered up by the wood trim.
Can I put drawer handles over the cane?
Yes! Originally I thought I would add these acrylic drawer handles right in the middle of my cane inserts, but once I saw how beautiful the cane looked, I ended up choosing hidden pulls that wouldn’t take away from the look of the cane. Depending on the handles you choose, you can also adhere them to the wood trim or leave the drawer handles off completely for a more modern look.
I want to paint my dresser. Can I paint the cane, too?
Yes! Although I chose not to paint my cane webbing, you absolutely can paint it. Here are a couple things to keep in mind:
Paint the dresser first. It will be really difficult to get a nice, even coat if you paint over the cane once it’s adhered to the dresser.
Paint both sides of the cane. There are lots of nooks and crannies on the cane webbing, so after doing one coat, flip it over and do the other side.
Chalk paint works the best, but if you can’t find the right shade, make sure you prime the cane first because it will soak up the paint very quickly.
I hope you find this DIY as fun and empowering as I did. It’s the perfect do-it-yourself project for beginners because the IKEA dresser reduces the actual “building” aspect, meaning less power tools and more beginner tools. You also have the freedom to paint this dresser, add some flair with unique hardware, or replace the cane with a fun fabric or wallpaper. Either way, be sure to follow me on Instagram and Pinterest and tag me so I can share your DIY cane dresser IKEA hack with our community!

